In a world overflowing with smart home options – Alexa, Google, Apple HomeKit, Samsung SmartThings – one platform stands out as the holy grail for tech enthusiasts: Home Assistant. If you’re ready to dive beneath the surface and truly own your smart home experience, this is where your adventure begins.
My Smart Home Journey
When I first installed Home Assistant in early 2023, I had no idea it would transform into the technical rabbit hole that would feed my inner geek in ways I never imagined! What started as “just another smart home setup” evolved into a fascinating technical playground that continues to teach me something new every day.
As friends and family witnessed my growing smart home powers, they inevitably asked: “How can I do this too?” That’s exactly why I created this guide – to share what I’ve learned and help you navigate your own Home Assistant journey. Remember, this is the ultimate “choose your own adventure” project, with endless possibilities to make it yours!
What Is Home Assistant (And Why It’s Amazing)
Home Assistant is an open-source platform that puts you in control of your smart home. Unlike cloud-dependent alternatives, Home Assistant runs entirely on your own hardware, keeping your smart home data where it belongs – with you.
What makes it truly special:
- Integration Powerhouse: With over 2,000 integrations, Home Assistant can connect virtually any smart device – from popular brands to obscure gadgets. It brilliantly bridges both local and cloud-based devices into one cohesive system.
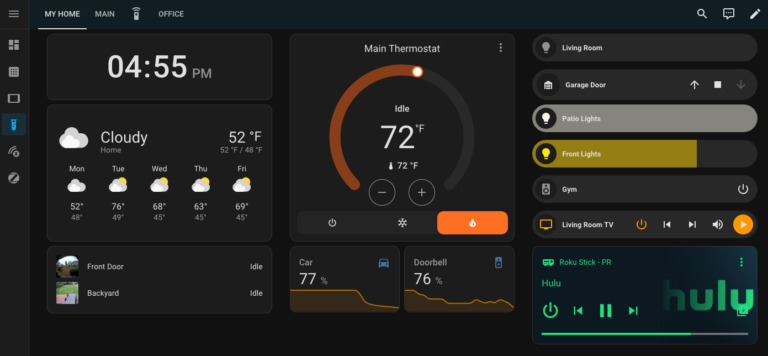
- Unlimited Customization: The dashboard (formerly Lovelace UI) lets you build interfaces perfectly tailored to your needs. Create automation workflows ranging from simple light controls to complex environmental systems that respond to weather, calendars, and who’s home.
- True Technological Freedom: No more vendor lock-in or worries about manufacturers shutting down their servers. With Home Assistant, you own your smart home experience completely – combining privacy, flexibility, and incredible community support.
The tradeoff? You’ll need to run the software on your own hardware, which adds some complexity – but that’s exactly where the fun begins for tech enthusiasts!
Before You Install: What You Need to Know
This isn’t a step-by-step installation guide (plenty of those exist already). Instead, I’m sharing my personal recommendations based on what’s worked well for me and what I suggest to friends. Consider this your pre-installation strategy guide from someone who’s been in the trenches.
Choose Home Assistant OS (HAOS)
My strongest recommendation is to use Home Assistant OS (often called HAOS). This complete operating system can be installed directly on hardware or within a virtual machine. While other installation methods exist, the OS approach offers the smoothest long-term experience, particularly when it comes to updates – which happen frequently with Home Assistant.
Selecting Your Hardware
You have two main paths here:
Option 1: Raspberry Pi 5
This popular single-board computer easily runs Home Assistant and is perfect for beginners wanting to experiment. However, be aware of two limitations:
- Storage Upgrade Needed: Skip the SD card and use an external SSD instead
- Future-Proofing: Once you catch the Home Assistant bug, you might soon want more power
Option 2: MiniPC (Recommended!)
This is my suggested route for most users. The options are vast, but I’ve had great success with the GeekOm Air. Many community members also recommend Beelink systems. One universal tip: whatever MiniPC you choose, upgrade to a high-quality SSD like a Kingston M.2 – your system will thank you!
You can also repurpose an old PC or laptop if you have one available.
Power Up with Proxmox Virtualization
Proxmox VE is an open-source virtualization platform that transforms your hardware into a powerhouse capable of running multiple virtual machines. This approach gives you incredible flexibility as your home tech ambitions grow.
With Proxmox, you can:
- Run Home Assistant as one VM
- Add additional services as you discover them
- Create development environments
- Experiment with other operating systems
Critical Warning: Proxmox requires a wired Ethernet connection – WiFi won’t work!
I followed this comprehensive guide to set up both Proxmox and Home Assistant.
Troubleshooting Note: I encountered connection issues with my RealTek RTL-8169 Network Interface Card. After trying numerous solutions, I created a script to reboot the system when it detects internet connectivity loss. Not ideal if your ISP has frequent outages, but it works for me.
Accessing Home Assistant Remotely (Safely!)
This is crucial: DO NOT simply open ports in your router to access Home Assistant remotely! I cannot emphasize this enough.
Instead, use one of these secure methods:
- Pay Nabucasa; I know the point was to avoid monthly payments, but this goes to support HA and is easy!
- Set up Tailscale or WireGuard as a VPN to connect to your home network
- Implement the CloudFlare Tunnel Add-On (requires some DNS knowledge and owning a domain)
Pro Tip: You can get a .xyz domain with 6-9 numeric digits (like 123456789.xyz) for just $0.99!
Setting up Local Devices
Once you have Home Assistant running, you’ll inevitably face the great smart home protocol debate: Zigbee vs. ZWave. Both have their strengths and ideal use cases, and your specific needs will guide which direction to take – or whether to embrace both!
You can find my detailed comparison of these protocols here, which covers range, reliability, power consumption, and device compatibility to help you make an informed decision.
Backups: Your Smart Home Safety Net
Imagine spending hours fine-tuning your Home Assistant setup, creating the perfect automations, and integrating all your devices… only to lose everything due to hardware failure or a botched update. That nightmare scenario is why backups are absolutely critical for any Home Assistant installation!
Fortunately, Home Assistant includes a robust backup system that makes this process relatively painless. The backup feature captures your entire Home Assistant configuration, including installed add-ons, configurations, and settings.
Here’s what you need to know:
- Automated Scheduling: Set up regular automatic backups – I recommend at least weekly backups, but daily is even better if you’re actively making changes.
- Remote Storage Options: Don’t just keep backups locally! Home Assistant can connect directly to cloud storage services like Google Drive, Dropbox, and OneDrive through the appropriate add-ons. This ensures your backups survive even if your Home Assistant hardware fails completely.
- Pre-Update Safeguard: Always create a manual backup before performing any system updates or making significant configuration changes. This simple habit has saved me countless hours of troubleshooting.
- Test Your Restores: Periodically verify that your backups can actually be restored. There’s nothing worse than discovering your backup strategy failed when you actually need it!
For extra peace of mind, I keep my Home Assistant configuration files in a Git repository. This provides version control and an additional backup option for my most critical settings.
Getting your backup system configured should be one of the first things you do after setting up Home Assistant. Trust me – you’ll thank yourself later when you inevitably need to restore your carefully crafted smart home brain!
Ready to Begin Your Smart Home Adventure?
Home Assistant transforms your relationship with technology, putting you in control rather than surrendering your home to corporate ecosystems. Whether you’re just starting out or looking to level up your existing setup, this platform will reward your curiosity and effort with a truly personalized smart home experience.
Stay tuned for more articles as I dive deeper into Home Assistant configuration, my favorite automations, and the lessons I’ve learned along the way!